Showing posts with label Old White. Show all posts

Wednesday, November 21, 2012

Shabby Chic


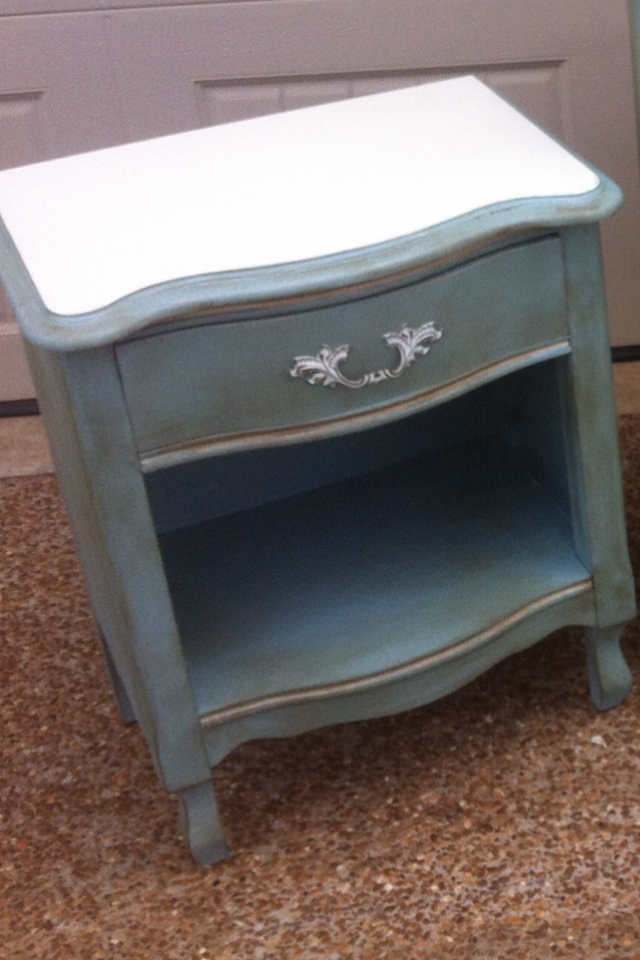
I have to be perfectly honest. I have never been a fan of the shabby chic look. So many people love it. It's VERY popular but it's just not for me. I work way too hard painting coat after coat of nice expensive paint, to destroy it all with a sander. I have avoided being asked to do it....until now. I bought a piece of furniture from a lady recently and when they brought it to me, she saw that I paint furniture. She ended up buying this Duck Egg Blue & Old White dresser and nightstand combo from me. 


She had a desk that she bought for her daughter that was extremely shabby chic. She loved the way it looked but she needed it to be Duck Egg Blue too.


She wanted it more white than blue, just the opposite of the furniture above. She also wanted it really distressed. I used chemical stripper (poison in a bottle) and started taking off the 10 layers of paint that were on it. After I stripped a few layers, I realized that I needed to keep some of the paint on it, so I could complete this project. She also brought me this plain old mirror to paint. I added the wooden design in the middle to fancy it up a bit. Here it is after and I must say, I love it. It reminds me of something I have seen in a Ballard Design catalog.


Monday, September 24, 2012

Something different

I recently bought this chest of drawers. It was nothing fancy. In fact, it was downright sad. It was inexpensive due to its condition though which was good enough for me. The top had gaps between the boards, the veneer was messed up on the sides and it was...well ugly. I always try and see ye potential in old furniture. I always try and save time and money too.
So instead of replacing the veneer or removing it and patching it, I cut off a board I had in my garage and put it in place on both sides. Easy fix!
I cut a new piece of luan for the back bc it wasn't in great shape either.
I used stainable wood filler for the top. I filled in the places between the cracks then sanded it after a few days when it was completely dry.
The drawers are all dove tailed so I glued the joints back together to make sure everything is tight.
The drawer fronts needed to be sanded down pretty well too. After all of this, I was ready to paint it.
I chose Napoleonic Blue. It makes a nice bold statement. Then I chose to use my new chevron stencil and paint Old White chevron stripes on the drawer fronts. This was my first time stenciling anything like this and there are definitely some mistakes in the pattern. Shhhh...don't tell!
Then I got out the orbital sander and sanded the drawer fronts down. I applied clear and dark wax then buffed it until everything was smooth.
I really do love this piece! I still have to wax the rest of the dresser and paint some new hardware for the whole thing but it should be up for sale soon.
Here's a sneak peek.

Sunday, August 26, 2012

Aubusson Vanity

A friend of mine brought me this vanity Friday night. It's beautiful. She bought it at a garage sale for $30. It had a few layers of paint on it so she started to sand them off. Then she quit and decided someone else should have fun with it. My husband stripped all of the peeling crusty old paint off it then sanded it down.
Today I painted the outside with Aubusson Blue and Old White accents. The inside is a mixture of Emperors Silk and Old White. She wanted a very specific hot pink. It turned out very pretty.

Monday, August 20, 2012

Antique Old White Desk

I bought this beautiful desk a while back. It's pretty old and it was quite beautiful already. I put it up for sale recently and someone bought it immediately. She wanted the top refinished and everything else painted white with dark wax over it.
I refinished the top with Kona stain and painted the whole desk in Old White. After I saw how beautiful it was in white paint, I just couldn't put dark wax on it. She agreed so I just put clear wax on and distressed it. I am blown away by its beauty now.

Wednesday, July 11, 2012

Buffet

A friend of mine recently brought me her grandmother's buffet. She wanted the top stained dark and the bottom painted in Old White. I used some stripper and got the original finish off. Then I stained it with dark walnut stain. There is no before picture but it turned out just beautifully. She was thrilled with it!

Thursday, June 14, 2012

Paris Grey

I have been dying to use Paris Grey on something but nobody ever requests it. I decided enough is enough. I went and bought it and painted a chest of drawers that I needed to fix up and sell. The body was painted with Paris grey and the drawers are Old White and it was all painted with my new paint sprayer. I put clear and dark wax on everything and sprayed the hardware with Oil Rubbed Bronze spray paint. Oh and the inside of the drawers are painted in Antoinette. This is currently for sale for $200. Thanks for looking!!

Wednesday, May 9, 2012

A mini-makeover

This is a smaller sofa table I bought. It is very pretty, nothing wrong with the top at all. I figured to make things easier on myself, I'd leave the top exactly like it was. I like this kind of makeover.
So I painted the bottom, distressed it and put clear & dark wax on it. This one sold pretty quickly too.

Tuesday, May 8, 2012

Old White End Tables

I found this beautiful end table on Craig's List a few weeks ago. When I picked it up I couldn't believe how gorgeous is was. Of course, I had plans to make it even more beautiful. I have been staining the tops of furniture lately and painting the rest and people can't get enough of it. It is a very nice look.
I sanded the finish off the top and stained it darker then sealed it with polyurethane. I painted the rest of it with Old White, clear & dark wax. Then I distressed it a bit. I posted it on my craft page and immediately found a buyer for it.
My friend that bought the table wanted me to find her another one to match it. I had this one in my garage that I haven't gotten to yet. Tables don't have to match perfectly. In fact, I think it's better that they're not identical. I don't have the before picture but here's the after. I didn't have the hardware to put on it so I'll have to get a new photo after it has new hardware.

Monday, May 7, 2012

Sofa Table & Round Table

I get a lot of requests on my Facebook page for specific pieces of furniture. A lot of people ask me for sofa tables. I have bought several lately and found new homes for them all. I bought this one and found a new owner for it.
I sanded down the top of it, applied a coat of wood conditioner and stained it with Kona stain. This is a beautiful deep, dark color. The table was oak and it didn't get as dark as I wanted it to....even after 8 coats of stain. After I stained it, I put polyurethane on it and went through the process of putting a few more coats on. After a couple of days, I decided to sand down the entire thing and start over. This time I didn't put the wood conditioner on it. That helped a little bit. It still wasn't as dark as I wanted it but different types of wood take stain differently. After I got it stained and polyurethaned, I painted the whole thing in Annie Sloan's Old White. I put clear & dark wax on it and distressed it.
After this customer picked up her sofa table, she told me to be on the lookout for a small round end table. I had the perfect table for her! I had just painted it with Coco paint though, as an experiment.
I sanded the top down, stained it, painted the bottom, put dark wax over it and now it matches her sofa table.

Sunday, March 4, 2012

Sofa Table Redo

A friend of mine has been looking for a sofa table for a while now. She found one on a local "ebay" type site recently and bought it. She really wanted one with a shelf underneath but couldn't find one so she just bought this one.


She brought it over for me to paint. While she was here with it, I asked her if she wanted me to add a shelf for her. It seemed a lot easier in my mind and my husband was kicking me as those words were coming out of my mouth. Of course, I didn't notice immediately but these legs had a weird shape. They weren't perfectly square.


My dad drew out the outline of the legs on a piece of plywood that my husband cut. A lot of work with the jigsaw, a couple handfuls of paper towels, neosporin and gauze later the grooves were cut out. Yeah, my dad brought over his brand new jigsaw that he got for Christmas. He hadn't used it yet but he sure broke it in Saturday. Bless his heart, he ripped his finger open a couple places and we all know how fingers bleed. Yikes!

Anyway, after we got the shelf attached, I primed the whole thing, painted it with ASCP Off White, waxed with clear & dark wax, replaced the hardware and called it a night. Here's the sofa table now.

Monday, February 13, 2012

Nothing is safe in this house!

Nothing is safe from my paint brush! I will find a perfectly good piece of furniture, paint it, use it for a while and then months later think, Hmmm, what if it were this color instead? I really don't know how my husband puts up with this nonsense but thankfully for me, he does. Here's my latest redo and re-redo. Sorry this is short but my computer is 1 minute away from going dead. I need a new battery for my laptop. ARGH!!

Sunday, February 5, 2012

Another Day of Painting

I'm sure people think I'm crazy. Every Friday, someone asks me what my plans are for the weekend. Every Friday, I say the same thing, painting furniture. The same customer that I've been painting all this other furniture for, brought me a chifferobe and stool for the vanity. Luckily, she had painted the chifferobe with a few coats of white paint so that made my work easier. I put two coats of Annie Sloan's Off White chalk paint on it. Then I used clear wax followed by dark wax. Now it matches the bed that I painted.
Here's a before picture:


Here it is now with the headboard and footboard.


Monday, January 16, 2012

....and the footboard

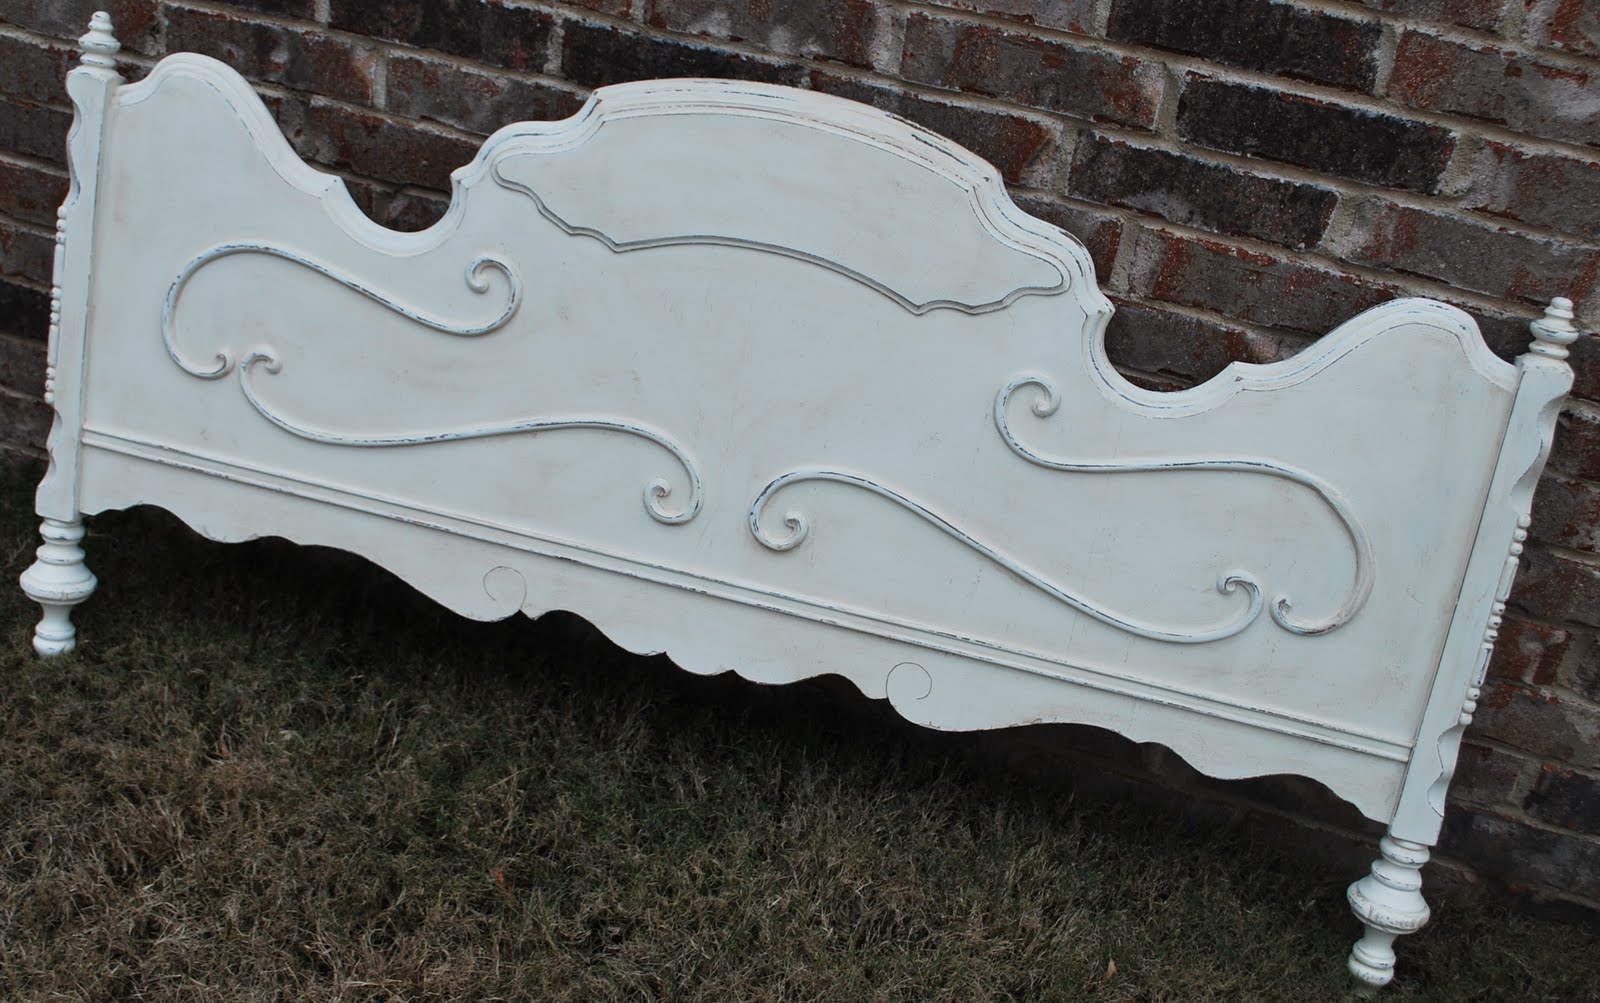
When this footboard was brought to me to paint and distress, I noticed that part of the beautiful scroll work was missing on it. I thought I could easily make a piece for it. HAHAHAHA!! That's what I get for thinking. First I resorted back to my kindergarten artwork days. I took out a piece of paper and a crayon and I traced over the place where the piece was missing. This was my "official" template. I bought a piece of maple and I traced my pattern onto the wood. Then I used a band saw to cut it out. I went through about 5 of these cut out pieces until I got the right one.
Of course, the scroll work is rounded on the edges so this was a big obstacle for me. I borrowed a friend's Dremel tool and got to work. Oh yeah, and my dad had to come over and save the day and help too. Thanks dad!


I cut the piece out and sanded it down by hand to start rounding the edges. We glued it to the footboard and then once it was dry, we started sanding it down with the Dremel tool until it was even with the rest of the scroll work. This seemed much easier in my head than it actually ended up being. We sanded, and sanded and sanded some more and just when I thought we were done guess what? Yep! We sanded again!
Anyway, of course, the piece of wood that we used doesn't match the rest of the bed because the bed is mahogany and the piece we used is maple so this created a bit of a problem when I distressed it this morning.
Okay, I'll be quiet. Here's a before shot of the footboard:


And here are the after shots


Next up, a chifferobe & vanity with mirror. I can't wait to get a hold of this furniture and make it B-E-A-Utiful again!!