I recently bought this beautiful antique buffet. I got it for an unbelievable price. It belonged to this woman's grandmother and she just didn't have the room for it. It is 5 feet long and quite incredible. It was in wonderful condition and really didn't need any work done. The top had a few water rings on it so when I posted it for sale, I said I would refinish the top and paint it whatever color someone wanted.
I came home from work one day and busted out the stripper and stripped the old gunk off it. It took me three coats of stripper to remove the old varnish. Then I planned on using steel wool & sandpaper and finishing it up. My sweet husband came home from work and volunteered to help me sand. I'm definitely not turning that down! He used the orbital sander and left it in one place for too long and it completely removed the veneer from one spot about 6" wide. He asked if that was a problem and if I'd be able to stain over it. Unfortunately, there was nothing I could do with that. There was no veneer and no grain, nothing for me to stain. The wood underneath the veneer is poplar and it's just not flattering.
So I went to our local woodworking specialty store and spend $60 on a roll of cherry veneer. The thought of unrolling it and having to put it on scared me to death! The veneer that I have always used for repair work was very, very thin and broke if you looked at it. My dad came over and helped me remove all the old stuff from it. He believes in using old fashioned scrapers instead of sandpaper. It takes a lot longer but it would save me a TON of money if I actually used them.
The man that sold me the veneer told me to apply Titebond II to the back of the veneer & to the top of the buffet. He said to let the glue dry completely and then put the veneer on the buffet. Then he said to put aluminum foil on top, turn the iron on medium high heat and iron the whole thing.
I asked a friend of ours how to do it and he told me to do something totally different. He said to use contact cement instead of glue. We took his advice.
Here are our supplies. 14 dowel rods, a utility knife, a 2 ft long piece of 4" PVC pipe, a quart of contact cement and the cherry veneer. I used a 3" paintbrush and painted the contact cement on the buffet. Then I did the same with the back of the veneer. I let it dry completely.
Then we put the veneer down on top of the dowel rods.
After we made sure the grain was lined up correctly, we removed the first dowel rod. We used a heavy piece of PVC pipe as a roller and started rolling it.
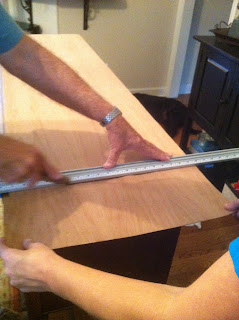
After we had the veneer on and it was completely stuck into place, then came the harder part. We had to use a utility knife and cut the excess veneer. The buffet has molding around three sides so we had to make sure the veneer was lined up perfectly with that. The back was the easy part. We used a straightedge and held it in place while my dad scored the veneer. You just score it over and over and over until the veneer just falls off. You don't want to force it.
And here's the finished product. I think it turned out great for our first time working with such a large piece of veneer.
Then came my least favorite part...refinishing it. I used water based stain instead of oil based and I think I like it more. The stain is Espresso by General Finishes. It has two coats of Espresso stain and three coats of General Finishes Water Base High Performance Top Coat, lightly sanded in between coats.
My customer picked out a specific paint color at Lowes, Paprika by Eddie Bauer. I painted two coats of Paprika, then sealed it with Annie Sloan's clear & dark wax.


Great tutorial! Thanx for sharing! It looks fabulous!
ReplyDeletethat is stunning! i am in love with that color- so fallish!
ReplyDeleteI adore this piece and the color is superb!
ReplyDeleteI would love if you came by my party happening now to link it up!
Stacey of Embracing Change
Thanks everyone! Stacey~I linked up at your party. Thanks for the invite Ü
ReplyDeleteThanks for this post about veneer. I know I'll be needed it down the road.
ReplyDeleteThank you for that post.
ReplyDeleteVeneer Manufacturer in India, flush door Manufacturer in India